
USE, MAINTENANCE & CARE GUIDE
WARRANTY: 60 days from purchase date. Excludes broken clips for reasons as noted herein.
Thank you for purchasing a Cleandicator. We want you to have the best experience, and most successful use of the devise, so here are some pointers that may be helpful as a Cleandicator Owner.
1. RINSE
2. PLACE
3. DO NOT BLOCK
NEW CLEANDICATOR
1. PLACEMENT: Each dishwasher and brand have slight variances in how the water is sprayed throughout the enclosure. The goal for the CLEANdicator is to allow water to flow INTO the TOP. This is how it captures the water that causes the blue float indicator to rise to the clean position during a dish washing cycle.
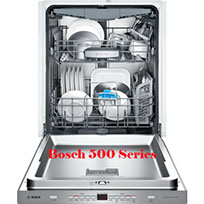
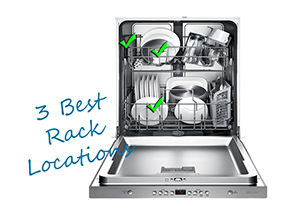
TOP RACK LOCATION: Center of the top rack at the front (door side). This is my favorite location, as it is the most visible for you, the user, in everyday life. Some higher end dishwashers, like Bosch 500+ series, do not have a water flow up and over the top of this location, so if in doubt, or if this top rack location does not work, try the bottom rack.
BOTTOM RACK LOCATION: We noted that some dishwashers have the water jetting from underneath, instead of above, and in those units it is best to put the Cleandicator on the bottom rack. Likewise, even some top jetting units don’t seem to stream the water to the edges well (yikes), so trying the bottom rack may be a solution for you. I like mine on the top rack, right in the front, for a great visual, but I have a dishwasher that sprays water from the top. A friend of mine likes hers on the side, out of the way of putting dishes in and out. Give it a try in your favorite location, and see if that works too!
Best locations to try:
If you have a BOSCH, try this: In the handle area (500 series), or closer to the utensil basket.
2. RINSE BEFORE USE: Another note would be that there could be particles from manufacturing (plastic dust), so best to run the unit under some water from your faucet prior to the first use.
a. Just hold it under the running water from your tap/faucet, until the blue indicator rises up to the clean indicator position.
b. Check polarity or magnets: While rinsing, when the blue float rises, the float should stay in place at the top, due to the magnets being near each other. This polarity is tested before shipping to you, but if either magnet got put in backwards, this would keep the float from staying in the blue position after the cycle runs.
3. HEAT ALIGNMENT: NEVER NEVER place your CLEANdicator in front of or directly next to a heat vent. Sometimes these vents are on the doors, and you won't realize you are putting it next to a vent when the door shuts. The unit is plastic. And, while it is made from a high heat plastic, still can melt or warp when in direct contact with such intense heat. Warping will impede the ability of the unit to work, as the float alignment is precise, and warping will cause it to stick.
4. DO NOT BLOCK WITH DISHES: *********** EXTREMELY IMPORTANT ***********
Make sure that you do not block the top (clear plastic top with holes) from getting water to it. Example: Putting a bowl right in front or over the area of the Cleandicator. The unit works by receiving water into the top of the device, and filling with water to make the blue float rise.
5. WATER CONDITIONS: Our Cleandicator device is engineered pretty precise, and the float the walls of the basin are close together. In some water conditions (example hard water), the type of water in your area may create suction between the walls of the float and basin. We have not had it happen yet where it impedes it working or cannot overcome the pressure of the water filling the device, but we have found that adding a dishwater rinsing agent, like Jet Dry, can aid in keeping things lubricated.
6. CLIPS ARE NOT MEANT TO BE PLACED ON OVERSIZED RUNGS: The clear clips that hold the Cleandicator in place are meant to be a bit loose. This allows the clips to keep the unit in place when water is sprayed at it from any direction. If kept or put under stress on a rung(s), they can break.
a. Do not place Cleandicator Clips on oversized rungs (as is found on some newer dishwashers on the top rung),
b. Do no place Cleandicator on an angle: where the two clips are at different levels (one higher than the other). This can cause unforeseen stress on the clips.
c. BROKEN CLIPS are not covered under warranty. As long as you are placing the clips on an oversized or uneven rung(s) that does not put them under tight stress, they will not break. If you feel your make and model of dishwasher, as well as you placement fits the guidelines herein, please contact us with that information and a photo of the inside of your dishwasher with the unit in place, and we will see if you have a separate issue that is covered by warranty.
MAINTENANCE AND CLEANING
7. We will be adding video tutorials for this section soon.
The unit will function better and longer for you if you keep it “clean” (free of debris inside). If you are the type to rinse your dishes before placing them in the dishwasher, you will have to do this less than those that place dishes with food particles inside the dishwasher.
TO CLEAN YOUR CLEANDICATOR:
Remove the Cover:
1. Gently remove the Cleandicator from your dishwasher rung by lifting upwards.
2. Hold the Cleandicator in one hand (if right handed, hold in left hand) between your index finger and thumb on the far ends/sides of the white basin (see the curved sections/finger spots engraved on the ends).
3. Gently squeeze the white basin on its ends between your index finger and thumb, while slowly and gently pulling the clear cover away from the white basin. The unit will come apart.
Cleaning via dishwasher cycle:
1. Place all parts in your dishwasher utensil rack for a nice easy cleaning on your next run of your dishwasher. Note: the unit won’t indicate “clean” for you on this one, LOL.
***OR***
Cleaning by hand:
1. Wash parts in soapy luke warm water.
2. Remove any built up residue or dirt from inside grooves or corners by using ear swabs and/or toothpicks to loosen or wipe those hard to reach areas.
3. Clear any debris from the water release holes (found at the bottom of the white basin) by using a straight pin or needle. Gently push sharp end into hole, turn a few times, and remove from the same side. Most needles will not go all the way through a hole, just poke the opening a bit.
Put Cleandicator back together:
1. Once you have cleaned the parts, simply reverse the order to reassemble the unit.
a. Align the grooves in the float with the flanges on the inside of the white basin, and insert the float into the basin.
b. Hold the Cleandicator the same as you did when taking it apart: Hold the white basin between your index finger and thumb, applying slight pressure to each end.
c. Take the clear cover and “rock” it into place by starting on the side that reads “Cleandicator”. Put those two (far apart) buttons in first, then rock the clear top down into the back buttons (closer together buttons found between the two rung clips).
Visually check that all four buttons of the clear cover are inside the white basin.
Re-Install your Cleandicator in your favorite location of your dishwasher.
You are ready to go.
If your Cleandicator is not working after trying the solutions in these notes and trouble-shooting guide, please contact me.
If pre-rinsing/testing the float under a tap, and placing the unit on the bottom rack does not work for you, and you are not “blocking” the top of the unit from getting water flow, then please let me know. These notes have solved all the issues we have had in the past.
If contacting me, I would also, for our records, like to know what type (make and model) of dishwasher you have.
Thank you again,
Amy Wolfe
Cleandicator Inventor
Copyright 2014-Present, Millwater Products, LLC. Cleandicator is an owned Trademark. All rights reserved. All information is deemed accurate, but not warranted. Pricing and offers subject to change without notice. Cleandiator is patented. The device contains magnets and is not a toy.